
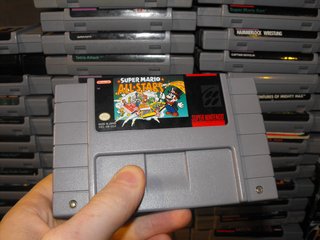
Hello again faithful readers. Today, I'm detailing the creation of my newest atrocity, Super Mario All-Stars NES.
I'm cramming the data of 4 games onto 8 Mbit EPROM chips and using a binary counter to cycle through the games by pressing the console's reset button.
Don't care about the technical details? Click here to see the final result in action.
Introduction:
|
These typically used a loader program with a menu to choose the game. Well today I'm going to put together a multicart with a hardware interface for choosing the game. |
 |
Super Mario Bros. 2 and 3 use the same PCB, and the hack of Super Mario Bros. 2J by Loopy was designed to work on a Mapper 4 board as well, although it doesn't need the WRAM chip that is present on TSROM boards. Finally, SMB3: Chaos Control is simply a level hack of SMB3, meaning it's the same game but with new level designs.
At this point people are probably frothing at the mouth to inform me about Mario Adventure, a very well respected hack of SMB3 that includes more than just new levels. Well to be honest, no one has shown me definitive proof that the game will work on a real NES. If someone has a working copy and wants to give me the technical details drop me a line. But please don't spam my inbox to tell me you've seen it for sale elsewhere.
The Facts:
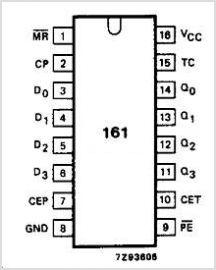 If you've read my other tutorials, you might recall my mention of a chip called a 74xx161 (xx being LS or HC, doesn't matter in this case), which was used as a basic mapper in early NES games. The 74xx161 is a 4-bit synchronous binary counter. Basically, upon each strobe of the clock pin, the binary value of the 4 output pins increases by 1. While the output counts up from 0 to 15, then starts over, if you just consider the lowest two pins, you might be able to picture how it can rotate between 4 different digital addresses.
The largest 8-bit EPROMs are 27C080 or 27C8001 EPROMs, which are 8 Mbit in size. which is equal to 1 MByte. Which means each "bank" of ROM space must be 1/4 of this, which is 256KB. 4 banks, 4 combinations of signals (00, 01, 10, 11) coming off the two pins from the binary counter, get it?
In essence, what we're doing is hijacking the two highest address pins of the EPROMs, and letting the NES only choose the lower address pins (A0-A17), so it only sees a 2Mbit ROM space at any one time.
Could you go for 8 banks by using three bits from the 4-bit counter, or 16 games using all four bits? You bet, but then you need your ROMs to be 128KB each for 8 games or 64KB or less for 16 games. The largest ROM included on this multicart will be the 256KB Super Mario Bros. 3 PRG ROM, and to keep the logic simple, this will be the size of each ROM bank.
Is this sort of mod possible for other cartridge-based systems? Probably. This project takes advantage of the fact that +5V is supplied to the cartridge at all times, even when in reset mode, and it also provides a direct link to the reset signal. I'm not sure this applies to all systems. Other systems might cut power to the cartridge, or might simply not provide any means of detecting a reset.
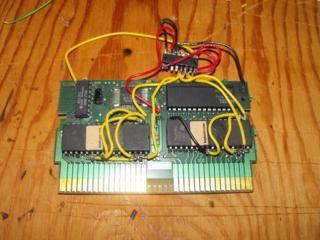
To test whether this was even possible, I wired up a little breadboard circuit:
What you'll need:
In fact, you'll need exactly the same things as in my Advanced / MMC3 NES Reproduction Tutorial plus a binary counter IC.
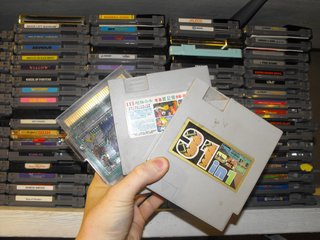
First, you'll need an MMC3-based PCB, but this time with a WRAM chip, so search on the NEScartDB for a TSROM. The easiest way to ensure you've got the right type is to just use a Super Mario Bros. 2 or 3 cartridge as a donor. Note that games based on TLROM should work on a TSROM PCB, but not the other way around. The WRAM chip is needed for SMB2 and SMB3.
Then you'll need things like an EPROM burner, two 27C080 or compatible EPROMs (8 Mbit in size for my multicart), a UV eraser, soldering iron, solder, wires.
Finally, you'll need a 74xx161, so either a 74HC161 or 74LS161. This was used as a mapper on early NES cartridges, so search the NEScartDB for a CNROM if you don't mind donating another game to your cause. Pick a junky sports game like John Elway's Quarterback that nobody's going to miss. Desolder or cut it off the board (preserving the pins at the chip edge obviously, since you have to use it). I decided that I ruin enough NES cartridges as it is, so I bought a package of 10 of these chips on eBay for about $5.
Getting sick of my terrible camera yet? Buy things on my For Sale page!
The Process:
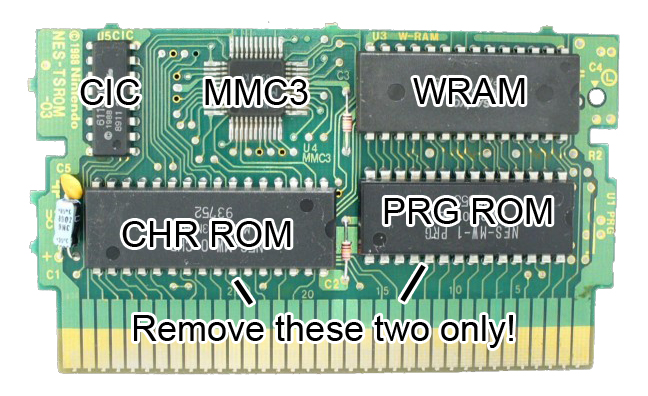
1. Follow my earlier Advanced / MMC3 NES Reproduction Tutorial from steps 1 to 4, but don't cut off the WRAM chip! When you're done, you should have a nice blank TSROM PCB and two blank EPROMs.
2. Now it's time to build your ROM images. If you have some experience with this, here are the basic steps you have to follow, then you can skip down to the next step:
- Split your ROM images into their component PRG and CHR ROMs with something like tniNES.
- Patch any ROMs with level hacks you want to include. I use the DOS program IPS.
- Concatenate each of these components onto themselves until each one is 256KB (you should end up with 4 PRGs that are 256KB each and 4 CHRs that are 256KB each). These numbers will be different if you're using a smaller EPROM with smaller games, obviously.
- Now concatenate all the PRGs together in order, and all CHRs in the same order!
For those of you that want to follow my exact design, here we go:
2a. To start off with, we need our 4 game ROMs. So obtain SMB2 and SMB3 from your favourite ROM site, and obtain the MMC3 hack of SMB2J from Loopy's site. Finally obtain the Chaos Control "IPS" file from Romhacking.net.
2b. Now make a copy of your SMB3 ROM for patching purposes (I'm calling mine smb3cc.nes for simplicity). You can use a graphical tool like Lunar IPS, but I'll give info for the original DOS program IPS. Put IPS.exe, your SMB3 ROM and your Chaos Control IPS in the same directory, and open up a command line.
C:\NES>ips smb3cc.nes smb3cc.ips
Now your smb3cc.nes file is patched. Load it up in your favourite emulator to verify it worked.
2c. Next we have to split the .NES ROMs into their component parts, namely the PRG, CHR and HDR files. The HDR files are the header information files, we will just discard them. For this step, I use tniNES, another simple DOS utility. Here's an example usage for that smb3cc.nes file we just patched:
C:\NES>tnines -s smb3cc.nes
Simple enough eh? This spits out smb3cc.PRG and smb3cc.CHR as well as smb3cc.HDR. You can toss out the HDR file. Repeat this step with the other 3 .NES files. Now you should have 4 PRG and 4 CHR files, although they're of different sizes.
2d. Now concatenate each of these 8 files up to 256KB. You'll notice that SMB3's PRG ROM is already 256KB, so there's no need to do anything with it (same with Chaos Control's). Every other file needs some padding though.
Refer to this handy-dandy diagram below to understand exactly what we're doing here.
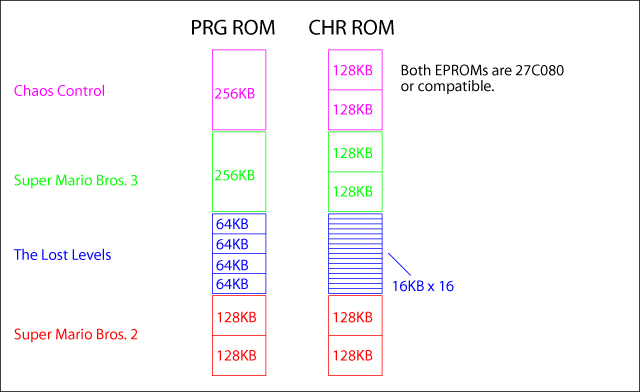
To concatenate a file, you use a simple DOS command. We can see from the diagram that I need to double up Chaos Control's CHR ROM from 128KB to 256KB. Here's the command I'll use:
C:\NES>copy /b smb3cc.chr + smb3cc.chr smb3ccBIG.chr
Don't forget that /b switch, it's very necessary to tell the copy command to use binary mode, not ASCII. Going back to the diagram, you can see that you have to concatenate The Lost Levels' CHR ROM 16 times! Take your time to make sure you don't make any mistakes.
2e. So, you've got 4 PRG and 4 CHR files, and they're all 256KB? Are you sure? Good. Now, using the same command, concatenate all the PRG files together, and all the CHR files together. Mine looked like this:
C:\NES>copy /b smb2BIG.prg + smb2jBIG.prg + smb3.prg + smb3cc.prg prgBIG.prg
C:\NES>copy /b smb2BIG.chr + smb2jBIG.chr + smb3BIG.chr + smb3ccBIG.chr chrBIG.chr
Notice once again that smb3.prg and smb3cc.prg are already 256KB in size, so we never had to concatenate them, which is why there's no "smb3BIG.prg" file, for example. Your prgBIG.prg and chrBIG.chr files should be exactly 1 048 576 bytes long, which is 1 Mbyte, which is 8 MBits. If they aren't exactly this big, you made a mistake!
3. Made it this far eh? Good for you. Now burn your EPROMs!
I'm not going to go through the whole EPROM setup this time, check my earlier tutorials for that info. One important change here is that 8 Mbit chips on Willem programmers need a little jumper configuration change. Don't rely on the program's interface for this, find an online manual. For my particular programmer, I had to remove a jumper to the left of the ZIF socket and replace it on a header, bridging two pins marked "P1" and "A19". If you don't do it correctly, it will appear to write without errors but won't pass the verify.
So, burn your prgBIG.prg file to a EPROM, and burn your chrBIG.chr to an EPROM. Once they're verified with the correct data, you can move on to the next step!
4. Prepare your PCB with a few wires (about 4" in length.. you can shorten them later) to accommodate your EPROMs' slightly different pin configuration (as compared to the PCB). You actually have to a bit less work in this case since we're stealing control of A18 away from the NES.
- On the PRG ROM socket, install wires in holes 1 and 24.
- On the CHR ROM socket, install wires in holes 1, 2, 24 and 31.
- On your PRG EPROM, bend up pins 1, 2, 24, 30 and 31.
- On your CHR EPROM, bend up pins 1, 2, 22, 24, 30 and 31.
- Install your EPROMS to the PCB.
- By following the diagram below, finish up your wiring.

The reset signal from the CIC acts as the clock trigger (connect pin 9 of the CIC to pin 2 of the 74xx161), and we wire the two lowest outputs to A18 and A19 of our EPROMs (connect pin 31 of both EPROMs to pin 14 of the 74xx161 and connect pin 1 of both EPROMs to pin 13 of the 74xx161). The other connections you see go to +5V and GND on the cartridge, they set up the chip for counting mode. You'll notice that in my picture I've grounded the inputs on the binary counter, but this isn't necessary since we're never loading them in.
This is actually a sculpture of the Flying Spaghetti Monster.
A good place for +5V is the bottom (towards the connector) of this resistor, and a good place for GND is this collection of pads in the top right of the board.
Now believe it or not.. the cartridge is complete. Reassemble your cartridge, being sure not to pinch any wires and give it a try.
Since we're not explicitly resetting the binary counter, it might not start at the first game. Mine tends to start on Chaos Control. No big deal. We could figure out a way to ensure it resets to 0 at the initial power on but it would involve more logic and it's just not all that necessary. You could probably use a 555 timer by building a one-shot circuit, but I'm not sure it'd be fast enough.
If you find that some games work and some don't, sadly you probably messed up way back when you assembled your ROM images.
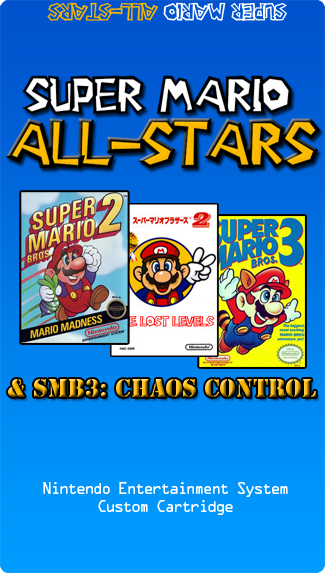 |
Here's the artwork I drew up for the label. Once again, I got it printed on adhesive paper, applied a laminate sheet, cut it out and stuck it on. You can take a look around on Google to find a Super Mario Font if you want to make your own. I just tried to emulate the SNES version. The Lost Levels box is a just a bit edited from the Disk System cover. I bet a Wii edition would look pretty snazzy too! Send me an email if you want a good copy of this label for printing. |
Conclusion
So what have we learned today? We've learned that we can trick the NES into only seeing certain areas of a ROM by hijacking a few address pins. We've learned that you can use pin 9 of the CIC security chip to watch for a reset button press from the NES. And we've learned a bit about how we can use discrete digital ICs in our projects, like the binary counter, something that can be a little intimidating for an Electrical Engineering student in today's theory-based curriculum.
Multicarts in the wild use a software menu to choose a game. How does that work, you might ask? I don't know. But judging from the amount of chips in my 110-in-1 cartridge, the menu software just loads addresses into a physical buffer and hands over control to the ROMs. This is why you generally have to power down your NES/Famicom to return to the menu screen. Maybe I'll attempt to schematic out my 110-in-1 for fun.
But why was this reset-button method rarely (if ever) used in production NES or Famicom multicarts? The easiest explanation is that the reset signal we're using from the CIC just isn't present on Famicom cartridges, since they didn't incorporate a security chip on the Famicom. This also means that this cartridge likely won't work on something like a Generation NEX or even a top-loader NES. It should still work on security-chip disabled original NES. The other reason is that people wanted big numbers on their multicarts. 110-in-1 sounds a lot better than 4-in-1, and it's not practical to scroll through 110 games with the reset button.
Ok folks, hope you had fun by creating a multicart of your own or by learning a thing or two about how NES cartridges work. Stay tuned for an article about making an arcade quality Arkanoid controller!